


Whether you are at home repair, remodel, DIY projects, woodworking projects and tool comparisons.
One of these basic tools is a framing nailer. A framing nailer is a nailer used to hold materials together. Rongpeng air framing nailer are necessary tools,They are very handy in several construction projects.
Different type framing nailer has different use guide,Pneumatic nailers are better suited for professional construction workers, now let’s learn how to use an air framing nailer,how to safety use the?
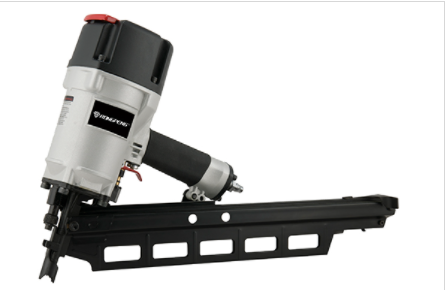
Pneumatic Frame Nailer
The pneumatic frame nailer is connected to and powered by an air compressor with a long hose. Similar to a pneumatic nail gun, when a nail is fired, a stream of compressed air pushes a piston, pushing the nail into the wood.
This mechanism has some advantages and disadvantages. On the one hand, it allows for faster and more powerful work. On the other hand, an air compressor is not a portable machine. It makes your nail gun less portable and harder to work in tight workspaces.
Safety guide
Warning:Must read carefully before use
Nailers are certainly tempting to use. However, there’s no substitute for rigorous safety precautions. The nailer doesn’t care whether it’s your first or hundredth time.
Nail guns are responsible for an estimated 37,000 emergency room visits each year. Here’s what you can do to avoid that:
Always wear gloves, goggles and a helmet to avoid any injuries from flying wood shards.
Never use your nailer if you’re feeling tired or drowsy.
Unplug your nailer when not in use and store it in a safe place.
Never remove the nailer’s tip to boost up your speed.
Make sure you’re working with the right angle before firing.
Don’t work with the nailer if the nails are jammed.
How to Use an Air Framing Nailer
1. Add a few drops of tool oil daily into air inlet coupler before
operating the tool
2. Attach air hose with high flow quick disconnect.
3. Regulate air pressure to obtain the air pressure to within the
recommended working pressure range, (70 ~ 120 P.S.I.G.)
4. Load fasteners into your tool following the instructions in this
manual.
Test for proper fastener penetration by driving nails into sample piece of wood. If fasteners do not achieve the desired depth, adjust the air pressure to a higher setting until the desired depth is achieved. If you are using a tool with a depth-control device, turn the thumb wheel until the desired depth is achieved.
Adjusting air pressure
Adjust air
pressure at recommended operating pressure 70 ~ 120 psi (4.9 ~ 8.3 bar)
according to the length of nails and the hardness of wood.
Correct air pressure is the lowest pressure which will do the job. Using air pressure higher than required to drive nails to proper setting puts unnecessary stress on tool and parts.
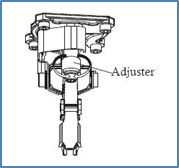
Adjusting nailing depth
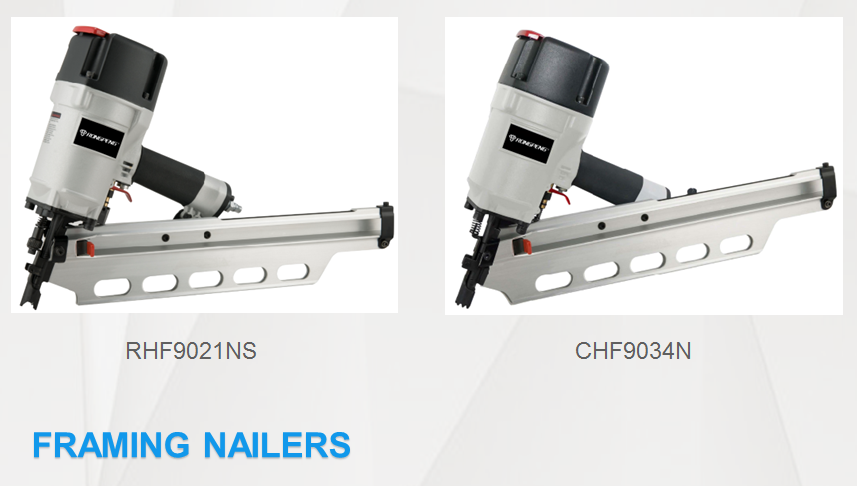
Warning!(Only Model RHF9021NS
with depth adjustment on safety)
Disconnect tool from air hose before turning the
adjuster thumb wheel on safety.
To assure
that each nail penetrates to the same depth, be sure that:
1. Air pressure to the tool remains constant (regulator is installed
and working properly), and
2. The tool is always held firmly against the work piece. If nails are
driven too deep or too shallow into the work piece, adjust the thumb wheel on
safety in the following order.
1. If nails are driven too deep, turn adjuster to the shallow side.
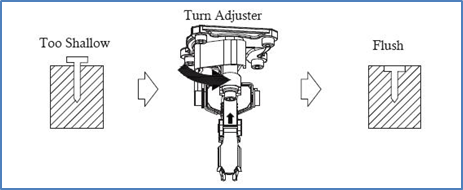
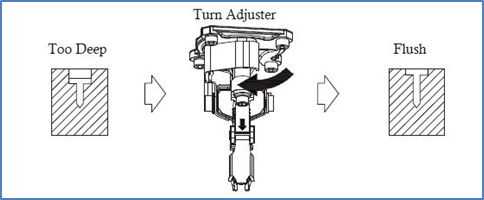
1.If nails are driven too shallow, turn adjuster to the deep side.
2. Stop turning the adjuster when a suitable position is reached for
the nailing test.
3. Connect the air hose. ALWAYS WEAR EYE PROTECTION.Perform a nailing test.

 video
video https://rongpeng.store